Showing posts with label free pattern. Show all posts

Thursday, July 14, 2011

Brainnnnssss, FREE PATTERN


I finally finished a new pattern. I was so inspired by all the amazing stuff on the etsy dark team, that I had to make something weird and a bit dark, so here it is:
Brainnnnnsssss. This little brain, likes zombies.......for diner.
download now

Tuesday, November 30, 2010

Free Pattern: Melting snowman amigurumi

It is snowing over here, so I decided it was time for a free pattern! The melting snowman. I even got to photograph him in the snow!!


I am trying something new. Instead of publishing the pattern here, I have a download button, which you can use! I am new to this, so please let me know if you have any problems downloading it. Have fun!!

Thursday, September 30, 2010

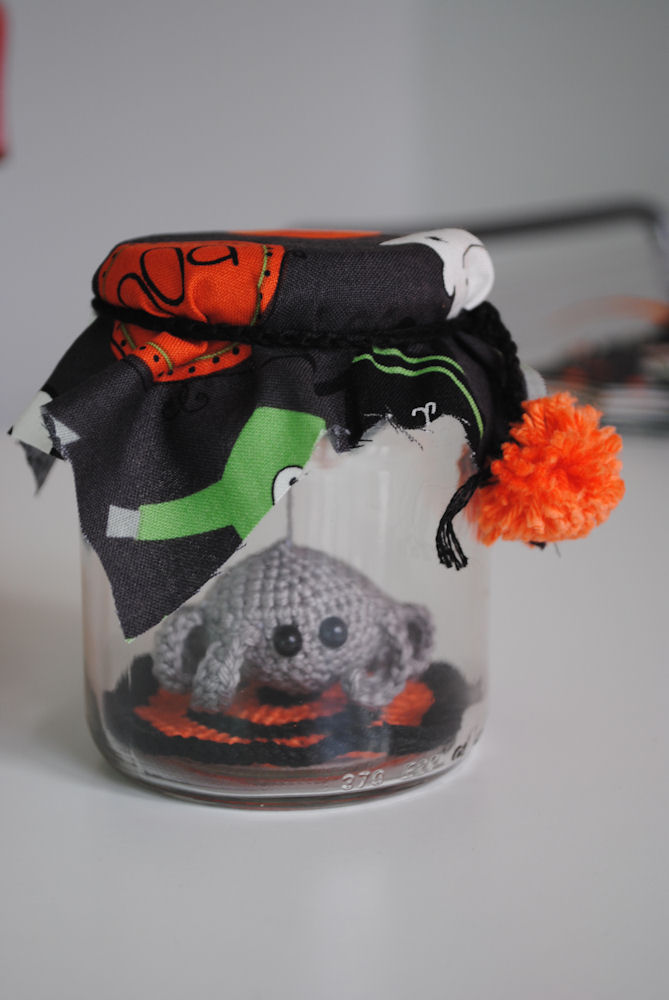
Free pattern: Spider in jar


I have a little cat in my home, who is about to give birth. I am waiting and waiting and waiting. And when I am waiting I need to crochet! So a new project: Spider in a jar!


Materials:
*empty jar
*black/grey and orange yarn
*little black eyes
*little scrap of halloween fabric
*little orange pompoms, handmade or bought in the shop. I made them with the clover pompom maker


Abbreviations
ch - chain stitch
sc - single crochet
inc - increase
dec - decrease
* - repeat between * and *

Spider
with grey
R1: sc 6 in magic ring
R2: inc around (12)
R3: *inc, sc* repeat around (18)
R4: *inc, 2sc* repeat around (24)
R5: *inc, 3sc* repeat around (30)
R6: *inc, 4sc* repeat around (36)
R7-9: sc 36
R10: *dec, sc 4* repeat around (30)
R11: *dec, sc 3* repeat around (24)
R12: *dec, sc 2* repeat around (18)
Stuff spider
R13: *dec,sc* repeat around (12)
R14: dec around (6)
Fasten off. Glue on eyes.
Spider legs
with grey
make 8
ch 10, sc into 2nd ch from hook, sc 8, Fasten off.
Secure legs to body of spider


Little round on the bottom of the jar
With black
R1: sc 6 in magic ring
R2: inc around (12)
With orange
R3: *inc, sc* repeat around (18)
R4: *inc, 2sc* repeat around (24)
With black
R5: *inc, 3sc* repeat around (30)
R6: *inc, 4sc* repeat around (36)
With orange
R7: *inc, 5sc* repeat around (42)
R8: *inc, 2sc* repeat around (56)
R9: *inc, 6sc* repeat around (64)
With black
R10: *inc, 7sc* repeat around (72)
R11: *inc, 7sc* repeat around (81)
Fasten off.

Finishing

Put the little orange/black round on the bottom of the jar
Make a little hole in the lid of the jar. Secure a long grey yarn to your spider. Take the other side of the yarn and pull it through the hole. Now make a knot, to secure the spider. Make sure he is hanging and not touching the bottom of the jar.


Cut a little piece of halloween fabric and put it over the lid. Secure it into place with a ribbon or use of a string of 70 ch st in black yarn. At the end of the string or the ribbon, secure the two little pompoms.

Happy Halloween!

Tuesday, September 21, 2010

Free Halloween Pattern: Happy Eyeball


As promised, a new free Halloween pattern


Happy Eyeball
Note: this pattern is for non-commercial use only. Do not sell or translate.
Materials
Yarn in black, white and blue (or green or brown, depending on the eyecolor you want to use)
Filling
Emboidery floss in red and black
Safety eyes
Abbrevviations
St - stitch
sl st - slip stitch
ch - chain
sc - single crochet
inc - increase
dec - decrease
*- repeat between * and *
Notes
* work in continuous rounds
*filling, I always use the inside from old cushions. It´s cheap and works great
*Important: if you make this toy for a child under the age of 4, embroider the eyes!
Eyeball
With white
(top)
R1: sc 6 in magic ring
R2: inc around (12)
R3: *sc 1, inc* repeat around (18)
R4: *sc 2, inc* repeat around (24)
R5: *sc 3, inc* repeat around (30)
R6: *sc 4, inc* repeat around (36)
R7: *sc 5, inc* repeat around (42)
R8: *sc 6, inc* repeat around (48)
R9-11: sc 48
R12: *sc 6, dec* repeat around (42)
R13: *sc 5, dec* repeat around (36)
R14: *sc 4, dec* repeat around (30)
R15: *sc 3, dec* repeat around (24)
R16: *sc 2, dec* repeat around (18)
Stuff eyeball and secure safety eyes
R17: *sc, dec* repeat around (12)
R18: dec around (6)
(bottom)
Fasten off, weave in loose ends
Glue on eyes, if you haven´t used safety eyes and embroider mouth at the top of the eyeball.
Embroider veins at the bottom of the eyeball.
Middle of the eye
With black
R1: sc 6 in magic ring
R2: inc. around (12)
R3: *sc, inc* repeat around (18)
With blue (brown of green)
R4: *sc 2, inc* repeat around (24)
R5: *sc 3, inc* repeat around (30)
Fasten off, weave in loose ends, secure to eyeball, on top of the veins.
Now secure a ribbon to finish your halloween decoration




Monday, September 20, 2010

Yay! the winner from the giveaway......

First of all, because so many people entered this giveaway, I decided to draw two names out of the bag.
So not one, but two people will both win, 2 patterns of printables of their choice from my shop!

And now.....

The winners.....
-Terri H. the recipefanatic
-Sue

Please contact me and let me know, what patterns, printables you would like.
Congratulations, to you!!!!!!

This is how I´ve chosen the winner.

Everyone who entered got a number


Then I put all the numbers in a bag and draw one out
Then I had the results number 17 and 33, terri and sue!
Everyone that didn´t win, don´t be sad, tomorrow I will have a free pattern for all of you!

Tuesday, August 10, 2010

cute fairies


Look at these cute faries made by wendy and sandra! Thank you so much for making them!

Made by Sandra, she also made them in different colours! Very cute!


Made by Wendy, check out her blog


Monday, May 31, 2010

Irish hat free pattern


I made this pattern as a present for a friend of mine. I think it also works great as a fathers day present.

You could also use my pattern of the mad hatters hat to create a present, on top of a bottle with soda or maybe filled with candy.

abbreviations:

ch - chain
sc - single crochet
sl - slip stitch
dc - double crochet
inc - increase
dec - decrease

Hat
with green

R1: sc 6 in magic ring
R2: inc. around (12)
R3:*sc 1, inc* repeat around (18)
R4: *sc 2, inc* repeat around (24)
R5: *sc 3, inc* repeat around (30)
R6: *sc 4, inc* repeat around (36)
R7: *sc 5, inc* repeat around (42)
R8: in backloops only *sc 6, inc* repeat around (48)
R9-20: sc around (48)
R21: *sc 5, dec* repeat around (42)
R22: In frontloops only sc around (42)
R23: inc, sc 6, inc, sc 6, inc, sc 6, inc, inc, sc 5, inc, sc 5, inc, sc 6, inc (50)
R24: *sc, inc* around (75)
R25: sc 15, inc, sc 15, inc, sc 15, inc, sc 15, inc, sc 10, inc (80)
R26: sc around (80)

Belt
With black

Work in rows instead of rounds
R1: ch 5, turn
R2-48: sc 4, ch 1, turn

Fasten off

Buckle
With yellow

Work in rows instead of rounds
Make 4
R1: ch 7, turn
R2: sc 6

Fasten off.
Put the buckle together

Sew belt and buckle to hat.
Take a little piece of green felt and cut a little clover, secure to hat.
Take a piece of green felt and secure it to the bottom of the hat. Cut an x in the middle, now you can put the hat on top of a beer or soda bottle!

Tuesday, April 20, 2010

FREE flower keychain crochet pattern!!!!!


Materials:
-crochet hook ( i used 2.0 mm)
-yarn/wool
-needle
-embroidery floss
-keychain ring
- ribbon
-maybe some beams


Abbreviations

st- stitch
sl st- slip stitch
ch - chain
sc - single crochet
hdc - half double crochet
dc - double crochet
tc - triple crochet
inc - increase
dec - decrease
* - repeat between * and *

notes

Work in continuous rounds, use stitch markter to keep track of where you are


With white

R1: sc 6 in magic ring
R2: inc around (12)
R3: *sc 1, inc* repeat around (18)
R4: *sc 2, inc* repeat around (24)
R5: through backloops only 24
R6: *sc 2, dec* (18)
R7: *sc 1, dec* (12)
R8: dec around (6)
Close, fasten off.

With red

Secure in front loops of round 5
*sc, (dc 2) in same st, (tc1, ch1, tc 1) in same st, (dc2) in same st* this makes 1 leaf, repeat 5 times. Now you will have 6 leafs in total.

Fasten off

If you like embroider mouth and eyes on flower.

Secure a bow to the flower (maybe add some beams) and tie it to the keychain ring.

hyves!

Hi there,

For all dutch people out there, I have a hyves now! Take a look ! In the blog section you will find my free patterns in dutch!

Hoi allemaal,

Ik heb nu ook een hyves. Neem even een kijkje. In het onderdeel blog, vind je mijn gratis patronen nu ook in het nederlands

Sunday, April 11, 2010

Been busy with different projects, but.....


.....my new crochet pattern is on its way.


I bought these great patterns from agreensleeve (do visit her shop it is fab!) on etsy and I spend all weekend sewing! There are so easy to make and I could use all different fabrics!

But I pick up crocheting this week again and a free pattern is on its way as well!

Have a great week everyone!!!!!!!