Thursday, September 30, 2010

Free pattern: Spider in jar


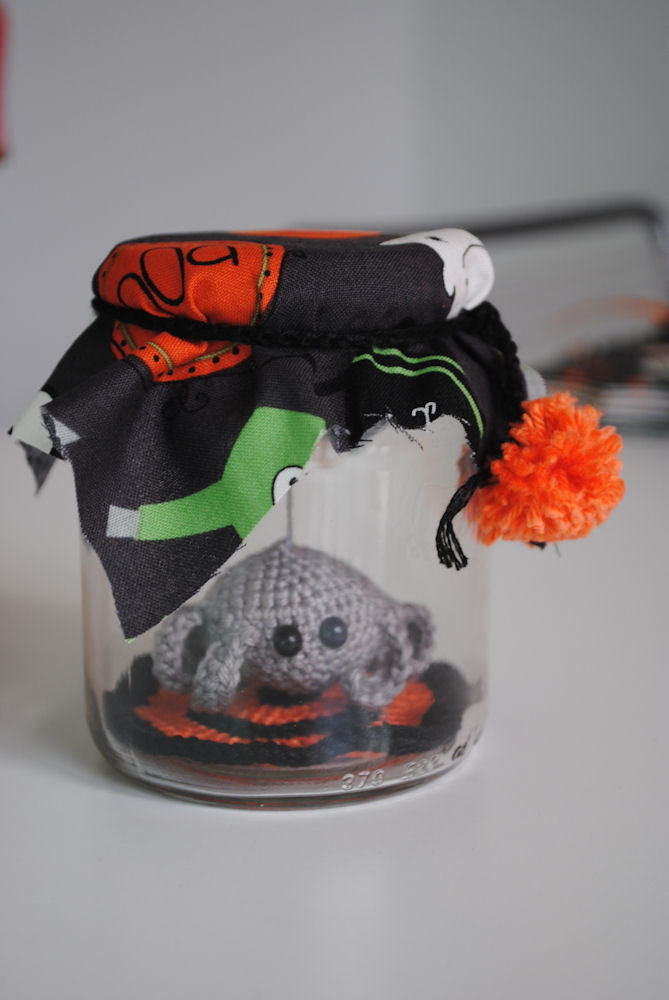
I have a little cat in my home, who is about to give birth. I am waiting and waiting and waiting. And when I am waiting I need to crochet! So a new project: Spider in a jar!


Materials:
*empty jar
*black/grey and orange yarn
*little black eyes
*little scrap of halloween fabric
*little orange pompoms, handmade or bought in the shop. I made them with the clover pompom maker


Abbreviations
ch - chain stitch
sc - single crochet
inc - increase
dec - decrease
* - repeat between * and *

Spider
with grey
R1: sc 6 in magic ring
R2: inc around (12)
R3: *inc, sc* repeat around (18)
R4: *inc, 2sc* repeat around (24)
R5: *inc, 3sc* repeat around (30)
R6: *inc, 4sc* repeat around (36)
R7-9: sc 36
R10: *dec, sc 4* repeat around (30)
R11: *dec, sc 3* repeat around (24)
R12: *dec, sc 2* repeat around (18)
Stuff spider
R13: *dec,sc* repeat around (12)
R14: dec around (6)
Fasten off. Glue on eyes.
Spider legs
with grey
make 8
ch 10, sc into 2nd ch from hook, sc 8, Fasten off.
Secure legs to body of spider


Little round on the bottom of the jar
With black
R1: sc 6 in magic ring
R2: inc around (12)
With orange
R3: *inc, sc* repeat around (18)
R4: *inc, 2sc* repeat around (24)
With black
R5: *inc, 3sc* repeat around (30)
R6: *inc, 4sc* repeat around (36)
With orange
R7: *inc, 5sc* repeat around (42)
R8: *inc, 2sc* repeat around (56)
R9: *inc, 6sc* repeat around (64)
With black
R10: *inc, 7sc* repeat around (72)
R11: *inc, 7sc* repeat around (81)
Fasten off.

Finishing

Put the little orange/black round on the bottom of the jar
Make a little hole in the lid of the jar. Secure a long grey yarn to your spider. Take the other side of the yarn and pull it through the hole. Now make a knot, to secure the spider. Make sure he is hanging and not touching the bottom of the jar.


Cut a little piece of halloween fabric and put it over the lid. Secure it into place with a ribbon or use of a string of 70 ch st in black yarn. At the end of the string or the ribbon, secure the two little pompoms.

Happy Halloween!

Tuesday, September 21, 2010

Free Halloween Pattern: Happy Eyeball


As promised, a new free Halloween pattern


Happy Eyeball
Note: this pattern is for non-commercial use only. Do not sell or translate.
Materials
Yarn in black, white and blue (or green or brown, depending on the eyecolor you want to use)
Filling
Emboidery floss in red and black
Safety eyes
Abbrevviations
St - stitch
sl st - slip stitch
ch - chain
sc - single crochet
inc - increase
dec - decrease
*- repeat between * and *
Notes
* work in continuous rounds
*filling, I always use the inside from old cushions. It´s cheap and works great
*Important: if you make this toy for a child under the age of 4, embroider the eyes!
Eyeball
With white
(top)
R1: sc 6 in magic ring
R2: inc around (12)
R3: *sc 1, inc* repeat around (18)
R4: *sc 2, inc* repeat around (24)
R5: *sc 3, inc* repeat around (30)
R6: *sc 4, inc* repeat around (36)
R7: *sc 5, inc* repeat around (42)
R8: *sc 6, inc* repeat around (48)
R9-11: sc 48
R12: *sc 6, dec* repeat around (42)
R13: *sc 5, dec* repeat around (36)
R14: *sc 4, dec* repeat around (30)
R15: *sc 3, dec* repeat around (24)
R16: *sc 2, dec* repeat around (18)
Stuff eyeball and secure safety eyes
R17: *sc, dec* repeat around (12)
R18: dec around (6)
(bottom)
Fasten off, weave in loose ends
Glue on eyes, if you haven´t used safety eyes and embroider mouth at the top of the eyeball.
Embroider veins at the bottom of the eyeball.
Middle of the eye
With black
R1: sc 6 in magic ring
R2: inc. around (12)
R3: *sc, inc* repeat around (18)
With blue (brown of green)
R4: *sc 2, inc* repeat around (24)
R5: *sc 3, inc* repeat around (30)
Fasten off, weave in loose ends, secure to eyeball, on top of the veins.
Now secure a ribbon to finish your halloween decoration


Monday, September 20, 2010

Yay! the winner from the giveaway......

First of all, because so many people entered this giveaway, I decided to draw two names out of the bag.
So not one, but two people will both win, 2 patterns of printables of their choice from my shop!

And now.....

The winners.....
-Terri H. the recipefanatic
-Sue

Please contact me and let me know, what patterns, printables you would like.
Congratulations, to you!!!!!!

This is how I´ve chosen the winner.

Everyone who entered got a number


Then I put all the numbers in a bag and draw one out
Then I had the results number 17 and 33, terri and sue!
Everyone that didn´t win, don´t be sad, tomorrow I will have a free pattern for all of you!

Wednesday, September 15, 2010

A Autumn giveaway!!!!!

The leaves are starting to fall frm the trees and the summer is almost over, my favourite season is starting. That is why I need to celebrate, so I decided to do a giveaway.

What to win?
2 patterns (or printables) of your choice from my shop. Click here to take a look around.

What to do?
Leave a comment or send me an email at funandfang@hotmail.com.

When will it end?
At monday 20 september at 12 (UTC+01:00) in the afternoon. Be sure to leave me a note before then.

When will I know if I won?
I will anound the winner tuesday. I will pick the winner randomly!

So good luck everyone!

Friday, September 10, 2010


There is a little post about my little bat halloween invitation on this cool site, make your own invitations! She did a great job with describing my pattern, take a look here


thanks so much to peata!


You want to make your own bat? Click here to get the pattern at my shop!


Monday, September 6, 2010

teenie halloweenies garland


Yes they are here!


The teenie halloweenie garland! The pattern includes: little pumpkin, devil, monster of frankenstein and candycorn! I am in love with them, You can save money by buying them in my pre sale! Only 4 dollars, the pre sale ends at 15 september 2010! So hurrrryyyyyyy.....


Friday, September 3, 2010

They are so sweet, if I say so myself


My new pattern is finished... I love them!! Who are they? Well just wait and see, they will be stars of the show next monday!